Browsed by
Category: Tech

VMSA-2022-0033 Critical VMware Security Advisory

VMSA-2022-0033 Critical VMware Security Advisory

On 13 December 2022 VMware released a security advisory for VMware ESXi, Workstation, and Fusion.

The VMSA carries a rating of Moderate with a CVSSv3 score of 5.9 for VMware ESXi 8.0 and 7.0

It carries a rating of Critical with a CVSSv3 score of 9.3 for Fusion 12.x and Workstation 16.x

Fusion 13.x and Workstation 17.x are Unaffected.

Upgrade ESXi 8.x to ESXi 8.0a Build 20842819 (or later)

Upgrade ESXi 7.x to 7.0U3i Build 20842708 (or later)

Upgrade Fusion to 12.2.5, or 13.x. Similarly, upgrade Workstation to 16.2.5, or 17.x

More details: https://www.vmware.com/security/advisories/VMSA-2022-0033.html

Pro Tip: Be sure to sign up for VMware Security Advisory emails by clicking the signup link on the VMSA page. This way you can be notified immediately when a new VMSA is released.

VMSA-2022-0027 – Critical VMware Security Advisory

VMSA-2022-0027 – Critical VMware Security Advisory

On October 25 2022, VMware released VMware Security Advisory VMSA-2022-0027 affecting VMware Cloud Foundation 3.x.

Resources:

VMSA-2021-0027: https://www.vmware.com/security/advisories/VMSA-2022-0027.html

The affected products do NOT include VCF 4.x, only versions earlier than 3.11. Most of these products are EOGS (End of General Support) and should be removed from production.

VMSA-2021-0028: Critical VMware Security Advisory (Multiple Products; Apache Log4j Vulnerability)

VMSA-2021-0028: Critical VMware Security Advisory (Multiple Products; Apache Log4j Vulnerability)

On Friday, December 10, 2021, VMware released VMware Security Advisory VMSA-2021-0028 affecting numerous VMware products including vCenter Server. This advisory is re: Apache Log4j vulnerability CVE-2021-44228 with a CVSSv3 score of 10 out of 10.

Resources:

VMSA-2021-0028: https://www.vmware.com/security/advisories/VMSA-2021-0028.html
FAQ: https://via.vmw.com/vmsa-2021-0028-faq
Unaffected VMware products can be referred to on the Knowledge Base article: https://kb.vmware.com/s/article/87068
VMware Blog “Investigating the Log4j Vulnerability”: https://blogs.vmware.com/security/2021/12/investigating-cve-2021-44228-log4shell-vulnerability.html

The key takeaway is that IMMEDIATE ACTION IS REQUIRED. Workaround should be applied to all running products immediately.

This is being actively exploited in the wild, and should be treated as an emergency change with highest priority.

This vulnerability is in the open-source Apache Log4j Java logging library, which is used in numerous software packages. This is not a VMware-specific issue.

Additional background information:
Tech Solvency Log4Shell log4j vulnerability (CVE-2021-44228) – cheat-sheet reference guide

Birmingham AL VMUG – October 2021

Birmingham AL VMUG – October 2021

#vCommunity – Get involved on Twitter:

@ShanFitz, @vMiklm, @DerrickSkipwith, @BhamVMUG, @myVMUG, @vExpert, @VMware, @VMworld

#vExpert

VMworld session replays: vmware.com/vmworld

Recommended sessions:

Multi-Cloud:

MCL1833 – 10 Things You Need to Know About Project Monterey

MCL1853 – 60 Minutes of Non-Uniform Memory Access (NUMA) 3rd Edition

MCL3222 – VMware Cloud on AWS Outposts: Bring VMware Cloud to Your Data Center

MCL1635 – Extreme Performance Series: Performance Best Practices (vSphere 7 Performance Best Practices Whitepaper)

MCL1277 – A Big Update on vRealize Operations (also recommend: vROps VM Performance Dashboard Deepdive https://youtu.be/9BH7cEJAlu0)

MCL1202 – VMware DRaaS

MCL2768S – Dell APEX Cloud Services with VMware Cloud

MCL1453 – Introducing VMware Project Capitola

MCL2019 – What’s New: Skyline Pro

App Modernization:

APP1482 – Explore Tanzu Community Edition
(How-to blog for Tanzu CE on MacOS: https://www.samakroyd.com/2021/10/06/tanzu-community-edition-on-macos/)

APP2183 – Introduction to Kubernetes for the vSphere Admin (also: kube.academy)

End User Services

EUS1289 – VDI Nerdfest 2021: Demos That Make Admins Drool

Security

SEC1287 – Mount a Robust Defense in Depth Strategy Against Ransomware

vSphere Security Configuration guide

VMSA-2021-0020: Critical vCenter Server Security Advisory

VMSA-2021-0020: Critical vCenter Server Security Advisory

On Tuesday, September 21, 2021, VMware released VMware Security Advisory VMSA-2021-0020 affecting vCenter Server. This VMSA contains 1 Critical advisory and 18 Important advisories.

Resources:

VMSA-2021-0020: https://www.vmware.com/security/advisories/VMSA-2021-0020.html
Workaround*: VMware KB 85717: https://kb.vmware.com/kb/85717
FAQ: https://via.vmw.com/vmsa-2021-0020-faq
VMware Blog “VMSA-2021-0020: What You Need to Know”: https://via.vmw.com/vmsa-2021-0020-blog
VMware Communities: https://via.vmw.com/vmsa-2021-0020-community

*Workaround provided only for 1 Critical vulnerability. Additional 18 lower vulnerabilities require patch to be applied. Workaround should only be used as a temporary measure until patching can be completed. Refer to FAQ for additional information.

The key information to share is that IMMEDIATE ACTION IS REQUIRED. Apply the vCenter patch version now, or apply the workaround (and understand the impact to functionality) if you cannot patch immediately.

VMware has released a very detailed blog and FAQ for this VMSA, which should help clarify questions that are sure to arise. These resources are linked above.

VMSA-2021-0010: vCenter Server Security Advisory

VMSA-2021-0010: vCenter Server Security Advisory

On Tuesday, May 25, 2021, VMware released VMware Security Advisory VMSA-2021-0010 affecting vCenter Server versions 6.5/6.7/7.0.

Resources:

VMSA-2021-0010: https://www.vmware.com/security/advisories/VMSA-2021-0010.html
Workaround: VMware KB 83829: https://kb.vmware.com/s/article/83829
FAQ: https://via.vmw.com/vmsa-2021-0010-faq
VMware Blog: VMSA-20210-0010: What you Need to Know
VMware Communities: https://via.vmw.com/vmsa-2021-0010-communities

The key information to share is that IMMEDIATE ACTION IS REQUIRED. Apply the vCenter patch version now, or apply the workaround (and understand the impact to functionality) if you cannot patch immediately.

VMware has released a very detailed blog and FAQ for this VMSA, which should help clarify questions that are sure to arise. These resources are linked above.

Updated vSphere Security Configuration Guides

Updated vSphere Security Configuration Guides

As a follow-up to the previous post, VMware Security expert Bob Plankers has just published an update to the vSphere Security Configuration guides. The changes are detailed in a blog article here: 

https://blogs.vmware.com/vsphere/2021/02/evolving-the-vmware-vsphere-security-configuration-guides.html

One specific item of interest around OpenSLP/CIM service (ref. VMSA-2019-0022, VMSA-2020-0023):

“Added and updated guidance for disabling SLP and CIM service daemons on ESXi. Security advisories are often good opportunities to assess the state of things, and most customers do not use these protocols. No VMware products use these protocols, either. We now have good methods and guidance for disabling them.”

Furthermore, while not detailed in the blog, I understand that slpd service is disabled by default in ESXi going forward.

You can download the vSphere Security Configuration guides at https://core.vmware.com/security-configuration-guide

OpenSLP/CIM Service Security Advisories for ESXi

OpenSLP/CIM Service Security Advisories for ESXi

There have been recent publications that mention VMware related security vulnerabilities. These articles serve as a reminder of the importance of regular patching.  This is the best defense against vulnerabilities and should be a foundation of your security policy. Specifically, two CVEs are mentioned: CVE-2019-5544 and CVE-2020-3992. These issues were disclosed with a critical severity rating months ago in VMSA-2019-0022 and VMSA-2020-0023 respectively, and workarounds are documented in KB76372. The workarounds in the KB remove the possibility of exploitation. 

VMware publishes all VMware Security Advisories here. You can sign up to be notified by email of any new or edited Security Advisories.

Additionally, the following resources are recommended:

VMware Security Advisories: https://www.vmware.com/security/advisories.html
Mailing list for VMSAs: https://lists.vmware.com/mailman/listinfo/security-announce
VMSA RSS feed: https://www.vmware.com/security/advisories.xml
VMSA-2019-0022: https://www.vmware.com/security/advisories/VMSA-2019-0022.html
VMSA-2020-0023: https://www.vmware.com/security/advisories/VMSA-2020-0023.html
Workaround KB: https://kb.vmware.com/s/article/76372

Sample 3rd party publications:
ZDNet Publication: https://archive.vn/9UMj9
Reddit thread: https://www.reddit.com/r/sysadmin/comments/kysqsc/the_esxi_ransomware_postmortem/

Q&A:

What ESXi version should I upgrade/patch to?

As of this date, upgrade to one of the following builds, or newer:

ESXi 7.0 build 17119627 (4-November-2020) or newer (recommend latest build 17551050, version 7.0 Update 1d, 4-Feb-2021)

ESXi 6.7 build 17098360 (4-November-2020) or newer (recommend latest build 17167734, 19-November-2020)

ESXi 6.5 build 17097218 (4-November-2020) or newer (recommend latest build 17167537, 19-November-2020)

(Prior to upgrading ESXi it may be necessary to upgrade vCenter server. Refer to https://www.vmware.com/resources/compatibility/sim/interop_matrix.php#interop&2=&1=)

Are ESXi 5.5 and/or 6.0 impacted?

ESXi 5.5 and 6.0 are beyond End of Support from VMware; they are not tested for vulnerability and patches are not released.  I would operate under zero-trust & assume the vulnerability exists in these products.  vSphere 6.0 went EOS in March 2020, so it was included in the VMSA-2019-0022.  It was EOS before VMSA-2020-0023 was published.

How should I remediate older ESXi hosts?

You should be able to disable CIM service/OpenSLP on older hosts following the same KB (76372), or follow similar documentation for previous ESXi versions to stop/disable services.  You should also have network segmentation & limit IPs which can connect to ESXi/vCenter (limit to connections from a jump server etc.) which can help minimize exposure.  Firewall port 427 UDP/TCP.  There are inherent risks in running older, EOS products so you need to surround them with layers of protection following security best practices.

What is the impact of disabling CIM/SLP service on ESXi hosts?

There may be 3rd party tools which use CIM/SLP, but I cannot find specific documented examples of impact from disabling CIM/SLP service. My personal recommendation is that the security benefit from disabling it outweighs the minimal risk of impact that may be caused by disabling it.

You can run this command to get slp stats on an ESXi host:
esxcli system slp stats get

There is no known impact to VMware software such as vCenter or vROps.

What about VxRail systems?

Regarding the security vulnerabilities discussed below, per: https://www.dell.com/support/kbdoc/en-us/000157682/vxrail-vxrail-and-external-vcenter-interoperability-matrix

Apply VxRail release 7.0.130 (contains ESXi 7.0 U1c build 17325551) to patch these systems. Also note the required vCenter version, min 7.0 U1, recommended 7.0 U1c

Additional resources for reference:

ESXi build number/version mapping: https://kb.vmware.com/s/article/2143832

vCenter build number/version mapping: https://kb.vmware.com/s/article/2143838

Additional information provided by my colleague Jalissa Hunter:

Background to ESXI Ransomware Attacks: 

Two VMware ESXI vulnerabilities, CVE-2019-5544 and CVE-2020-3992, are being exploited by two ransomware gangs: RansomExx (also known as Defray777) and Babuk Locker. RansomExx and Babuk Locker are known to do extensive research on a probable target before enacting an attack. Both organizations are known for exploiting weaknesses in remote protocols, virtual VPNs, and targeting specific individuals in an organization via phishing and whaling emails. 

There are two pathways used by ransomware attackers to encrypt a vSphere datastore. They must:

  • Get access to admin vSphere privileges 
  • Get network access to the vSphere management environment 

Security remedies to mitigate attack entry from the methods mentioned above:

  • Domain Admin role(s) should not also have vSphere admin role, and normal user accounts should not have either of those roles.
  • Ensure that workloads are not on the same subnet as the management subnet of a vSphere environment, i.e., increase network segmentation. 
  • Attackers also attempt to target backups to prevent quick restoration of an environment. Ensure backups are on segmented storage. 
  • Narrow vSphere management access to a a limited set of authenticated IP addresses (use secured jump server, etc.)
  • If vSphere 7 is active in your environment, consider enabling Identity Federation feature for your AD and vSphere Trust Authority clusters for hosts that contain sensitive workloads. 
  • Update current security monitoring solutions to be able to recognize ransomware script from RansomExx. The following link contains example of the typical script utilized by RansomExx and Babuk for attacks: https://securelist.com/ransomexx-trojan-attacks-linux-systems/99279/

DISCLAIMER: This information is not endorsed by VMware and is not an official publication. This is a personal contribution to the vExpert/VMUG #vCommunity for informational purposes only, based on my own research.  Validate all information, research and test thoroughly, especially before applying any changes to production systems. Any official publication by VMware (VMSA, KB, release notes, etc.), Dell, government agencies, etc., should supersede this blog.

Birmingham AL VMUG Meeting – December 2018

Birmingham AL VMUG Meeting – December 2018

Presentation resources:

VMware Product Interoperability Matrices

vCenter Server 6.7 Update 1 Release Notes

ESXi 6.7 Update 1 Release Notes

vSAN 6.7 Update 1 Release Notes

Upgrade Considerations for VMware vSphere 6.7 (VMware vSphere Blog)

What’s New in Performance – VMware vSphere 6.7 (PDF)

VMware Design Studio

vCommunity – Get involved on Twitter:

@vMiklm, @BhamVMUG, @myVMUG, @vExpert, @VMware

#vExpert

Video:

Find vCenter PSC

Find vCenter PSC

Often it is necessary to determine the PSC a vCenter server is pointed to.  Is it an external PSC or an internal PSC?

In vSphere client, look at the vCenter Advanced Settings. Find the setting:

config.vpxd.sso.admin.uri

This URL will contain the hostname of the PSC.

Intel L1 Terminal Fault Security Vulnerability

Intel L1 Terminal Fault Security Vulnerability

The following resources should be helpful in understanding the Intel L1 Terminal Fault vulnerability announced today.

VMware KB 55636:  VMware Overview of ‘L1 Terminal Fault’ (L1TF) Speculative-Execution vulnerabilities in Intel processors: CVE-2018-3646, CVE-2018-3620, and CVE-2018-3615 (55636)

Patching for CVE-2018-3646 “L1TF – VMM” could have performance impacts in customer virtualization environments.  Refer to VMware KB 55806 for further details.

Overview video from Intel:

More detailed video from RedHat:

Configure scratch location with PowerCLI

Configure scratch location with PowerCLI

I encountered a number of clusters that had /scratch location configured incorrectly, many due to LUN migrations to new storage frames, and some that were never changed from default. For consistent configuration, due to the number of hosts & clusters involved, a script was needed.

I found the following via Google, which appears to be created by fellow vExpert “Virtual NomadAskar Kopbayev:
Automating configuration of a scratch location for ESXi with PowerCLI

I had to tweak just a few things to work for my environment:

# original source by vmnomad - https://community.spiceworks.com/scripts/show/3686-automating-configuration-of-a-scratch-location-for-esxi-with-powercli
# modified by @vMiklm - miklm.com - 19 January 2018
# Example use:
# PS> .\set-scratch.ps1 $vCenter $Cluster $Datastore $Folder
# PS> .\set-scratch.ps1 vcenter.local clusteresx08 SharedNFS01 scratch/clusteresx08

#Collect the vCenter, Cluster, Scratch_datastore & Folder
Param([String]$vCenter, [String]$Cluster, [String]$Datastore, [String]$Folder)

#Function to use multiple colors in one command
function Write-Color([String[]]$Text, [ConsoleColor[]]$Color) {
    for ($i = 0; $i -lt $Text.Length; $i++) {
        Write-Host $Text[$i] -Foreground $Color[$i] -NoNewLine
    }
    Write-Host
}

#defining array variables
$vmhost_array =@()
$dir = @()
$reboot_servers = @()

#Validating input
if (!$vCenter){
  Write-Color  -Text "Please provide valid vCenter name using ","'-vCenter' ","option, exiting.." -Color Gray,Red,Gray
  exit
}

if (!$Cluster){
  Write-Color  -Text "Please provide valid cluster name using ","'-Cluster' ","option, exiting.." -Color Gray,Red,Gray
  exit
}

if (!$Datastore){
  Write-Color  -Text "Please provide valid Datastore name using ","'-Datastore' ","option, exiting.." -Color Gray,Red,Gray
  exit
}

if (!$Folder){
  Write-Color  -Text "Please provide valid scratch folder name using ","'-Folder' ","option, exiting.." -Color Gray,Red,Gray
  exit
}

#Getting the path of the script
$scriptPath = split-path -parent $MyInvocation.MyCommand.Definition

#Connecting to vCenter server
Write-Color -Text "`nConnecting to ", $vCenter -Color Gray, Red
Connect-VIserver $vCenter | Out-Null

#Validating connection to vCenter
if(!$DefaultVIServers){
  Write-Color -Text "`nConnection to ",$vCenter," failed, exiting.." -Color Yellow,Red,Yellow
  exit
} elseif($DefaultVIServer.name -ne $vCenter){
    Write-Color -Text "Connected to wrong vCenter ", $DefaultVIServer.name ", exiting.." -Color Yellow,Red,Yellow
  } else {
  Write-Color -Text "Connection to vCenter ", $vCenter, " succeeded" -Color Green,Red,Green
  Write-Host
}

#Getting the list of the ESXi hosts in the $Cluster
$vmhost_array = get-cluster -name $cluster | Get-VMhost

#Mounting datastore to be used as a scratch location
New-PSDrive -Name "DS" -Root \ -PSProvider VimDatastore -Datastore (Get-VMHost -Name $vmhost_array[0] | Get-Datastore $datastore) | out-null
Set-Location DS:\$folder

#Collect the list of the folders
$dir = dir

#Check if the scratch folders exist for the ESXi hosts and create missing folders
Foreach ($vmhost in $vmhost_array)
{
If ($dir.name -contains $vmhost.name){
  Continue
  }
else{
  Write-Color -Text "`n Creating scratch folder for ", $vmhost -Color Green,Red
  mkdir $vmhost | out-null
  }
}

#Getting Scratch datastore [was getting UUID, didn't work, vCenter will convert it anyway -MM]
$dstorep = Get-VMhost $vmhost | Get-Datastore $Datastore

#Check if the ESXi host is already configured with correct scratch location
Foreach ($vmhost in $vmhost_array){
  $row = '' | Select Server_Name
  $configured_scratch = (Get-VMhost $vmhost | Get-AdvancedSetting -Name "ScratchConfig.ConfiguredScratchLocation").value
  $current_scratch = (Get-VMhost $vmhost | Get-AdvancedSetting -Name "ScratchConfig.CurrentScratchLocation").value
  $correct_scratch = "/vmfs/volumes/"+$dstorep+"/"+$folder+"/"+$vmhost
# Write-Host "`n Correct scratch is" $correct_scratch
# Write-Host "`n Configured Scratch on" $vmhost "is" $configured_scratch
# Write-Host "`n Current Scratch on" $vmhost "is" $current_scratch
  If (($configured_scratch -eq $correct_scratch) -and ($current_scratch -eq $correct_scratch)) {
    Write-Color -Text "`n ESXi host ", $vmhost, " was already configured with the correct scratch location" -Color Green,Red,Green
  } elseif($configured_scratch -eq $correct_scratch) {
  Write-Color -Text "`n The ESXi host", $vmhost, " was already configured correctly, `n but it hasn't been restared after the configuration change" -Color Yellow,Red,Yellow
  $row.Server_Name = $vmhost.Name
  $reboot_servers += $row
  } else {
    Get-VMhost $vmhost | Get-AdvancedSetting -Name "ScratchConfig.ConfiguredScratchLocation" | Set-AdvancedSetting -Value "$correct_scratch" -Confirm:$false | out-null
    Write-Host -Fore:Red "`n ESXi host" $vmhost "is configured with the correct scratch location"
    $row.Server_Name = $vmhost.Name
    $reboot_servers += $row
  }
}

#Provide output with the list of ESXi servers to be rebooted for the configration change to take effect
Write-Host -Fore:Green "`n The configuration of the scratch location for ESXi servers in cluster" $cluster "is complete"
Write-Host -Fore:Green "`n The following ESXi hosts have to be rebooted for the configuration change to take effect:"
foreach ( $server in $reboot_servers ) {
Write-Host -Fore:Red `n $server.Server_Name
}

#Exporting the list of ESXi hosts to be rebooted
$exportfilename =  "Servers_to_reboot.csv"
$exportfilepath = Join-Path -Path $scriptPath -ChildPath $exportFileName
$reboot_servers | Export-Csv -Path $exportFilePath -NoTypeInformation -Force
Write-Host "`n This list of these servers has also been exported to" $exportfilepath

#Change location back to original
Set-Location $scriptPath


Change vCenter Role for a list of VMs

Change vCenter Role for a list of VMs

Use case: An existing Active Directory group needs to be re-assigned a different Role with more restrictive permissions on a given list of VMs.

Assumption: New (restricted) role has already been created in vCenter. This is to quickly update the list of VMs with an existing Role.

$ADGroup = 'DOMAIN\ADM-VMManagers'
$NewRole = "VMManagers-RestrictedRole"

# Change this variable to the local path to your text list of VMs
$serverList = Get-Content e:\Powershell\RestrictedRoleVMs-list.txt

foreach ($vmName in $serverList) {
    New-VIPermission -Entity $vmName -Principal $ADGroup -Role $NewRole -Propagate:$false -Confirm:$false
    }

To get a list of inventory objects with the new Role assigned:

Get-VIPermission | where { $_.Role -eq 'VMManagers-RestrictedRole' } | Select entity, role, principal

References: [1], [2]

License groups in vROps 6.6

License groups in vROps 6.6

How to Remove “License Is Invalid” Watermark in vRealize Operations Manager

I have on good authority, although not publicly documented, that a code change happened in vROps 6.6 to resolve a bug where the “License is invalid” watermark was not showing up even when environments were not licensed. That is to say, no matter whether previous versions had valid license keys or not, the watermark never appeared. As a result of fixing this bug, some environments may now be seeing the watermark due to the incorrect construction of License Groups.

This is only applicable to using valid license keys in a supported manner. Nothing in this article is discussing bypassing valid product licensing for vROps. We carefully reviewed our VMware ELA with our AE and TAM to ensure we had valid entitlements.

The vROps environment I admin uses a combination of per-VM Advanced licenses and per-CPU vCloud Suite Advanced licenses. This is supported, as evidenced by the vRealize Operations 6.6.1 Release Notes:

You can deploy single choice and suite licenses together. License counting for individual license keys is handled through licensing groups. You can mix editions or licensing models …

However, the vROps documentation is extremely vague on how these license groups should or could be constructed.

We worked with VMware Support some time ago to establish license groups for each respective set of keys. However, upon upgrade to 6.6, we noted the “License is invalid” watermark appearing on many objects in the environment. License Keys were no longer associated with the License Groups. The dynamic criteria we used previously to create license groups was no longer valid in vROps 6.6, for reasons that are still not clear. After extensive work with VMware Support through BCS again, we have arrived at a solution that removes the watermark from all objects within our environment. I will try to elaborate on the general process here, as every environment will have unique requirements. Credit for this solution ultimately goes to Kyle P. at VMware Premier Support, and I hope a VMware KB eventually appears.

Criteria:
– License Group 1 “vCloud Suite” Host CPU-based licenses applied to Object type “Host System” for a given set of clusters.
– License Group 2 “VM Licenses” VM-based licenses applied to Object type “Virtual Machine” for all other VMs EXCEPT those on Hosts licensed with License Group 1.
– Use “dynamic” membership criteria, not static “Always include/exclude” lists to avoid manual maintenance of License Groups. This is an important distinction.

Important notes & considerations:
– When you apply a CPU license to a group containing Hosts, the VMs on the Hosts will still show “License is invalid” watermark. When you apply a VM license key to Virtual Machines, the Hosts on which those VMs run will still show the “License is invalid” watermark. I am convinced this is a bug in vROps, but I’m not getting much traction with the PR associated with my SR since a “workaround” is in place. So, the workaround is this: while the license is applied to the respective Object type of each License key, the related objects (parent or children) are also going to have to be included in membership for the License Group.

Let’s look at the example License Group 1 “vCloud Suite” first:

(I’m assuming if this article is relevant to you, that you know where to find License Groups under Administration – Management – Licensing & how to create/edit them.)
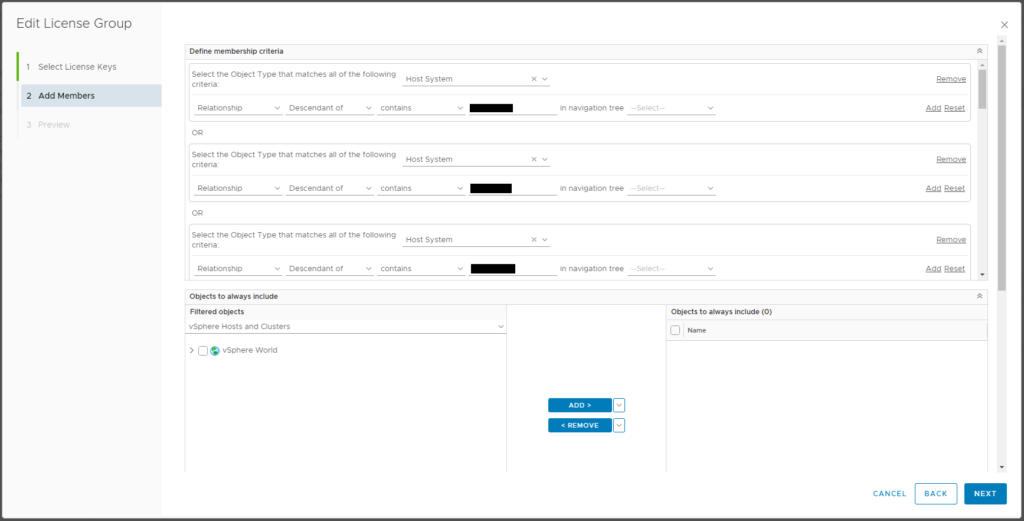

Object Type = Host System
Relationship – Descendant of – contains – [CLUSTER NAME] (a partial string can be used for wildcard matching) (If multiple clusters are needed that can’t be added with a wildcard, click “Add another criteria set” to create an OR construct and replicate the same criteria.)

This should make sense so far. We’re creating a License Group for CPU License Keys with membership of Hosts (which are descendants of the named cluster(s)).

Now here’s the part that is not so obvious: We also need to add additional OR criteria to select the Object Type “Virtual Machine” for all the VMs that live on these clusters. The license will not apply to the VMs for license utilization count, but the watermark will persist unless the VMs are added via this criteria.
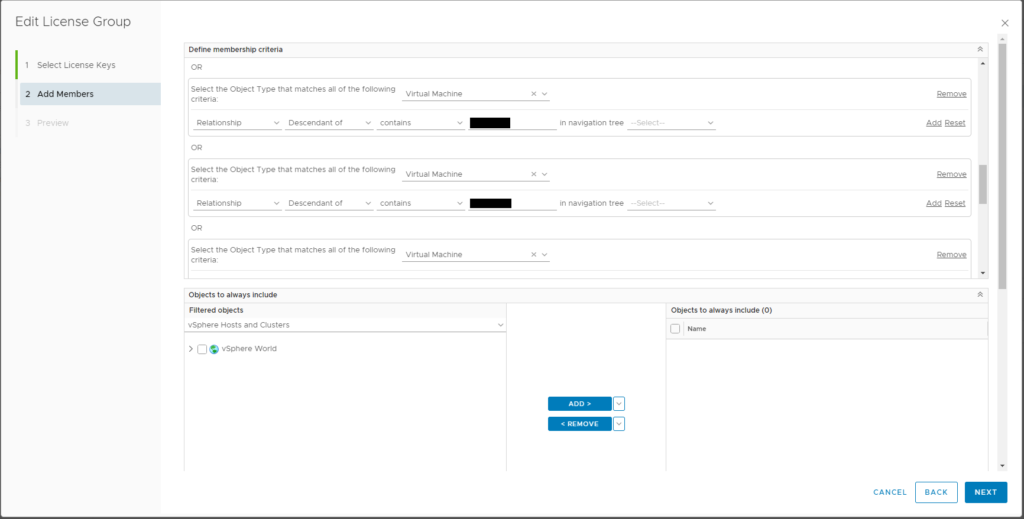

Object Type = Virtual Machine
Relationship – Descendant of – contains – [CLUSTER NAME] (a partial string can be used for wildcard matching) – use the same criteria to select clusters as above.

Now, License Group 2 “VM Licenses”

Remember from our Criteria above, this license groups will include all VMs that do not live on the Host Systems licensed with License Group 1.
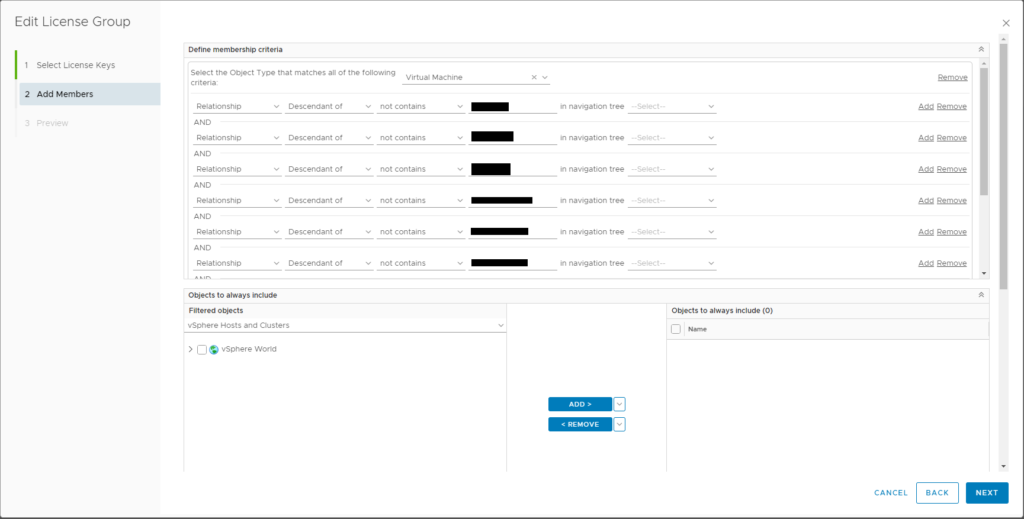

Object Type = Virtual Machine
Relationship – Descendant of – not contains – [CLUSTER NAME] (same string used in License Group 1 above)
For additional clusters, you’ll need to “Add” to use AND logic.

This selects all VMs in the environment that do NOT live on these clusters. Hopefully this makes sense. Now here again is the part that is does not follow logic: the Host Systems that host these VMs will still display “License is invalid” watermark until we add Host Systems to this license group. Again, I believe this is a flaw in vROps licensing, as the license group applying to object type Virtual Machine should not have to contain objects of type Host System. Despite that, in extensive testing, this is the workaround we’ve found to remove the watermark.
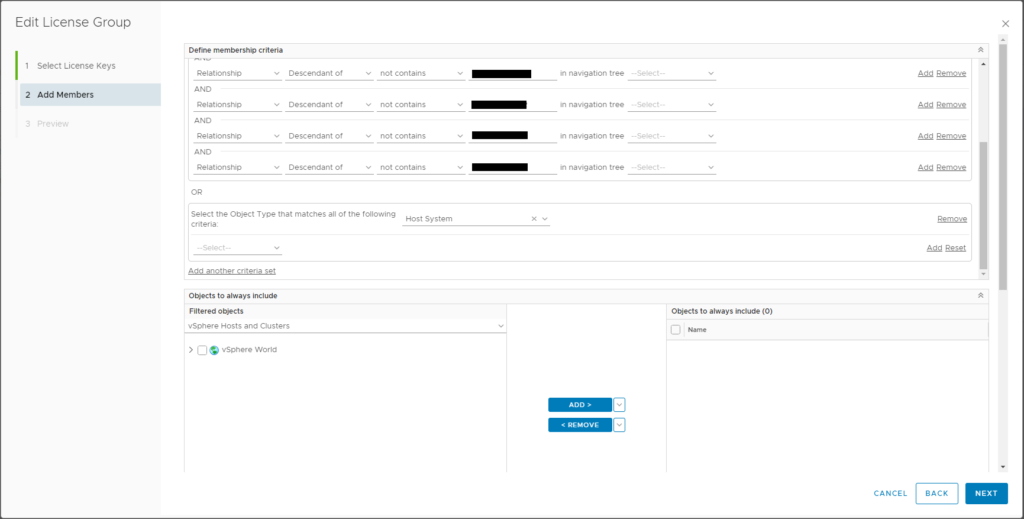
“Add another criteria set” (making an OR statement), Object Type = Host System.

That’s it. Note it can take a few minutes for the licensing to update. You can potentially speed this up by clicking Refresh under License Keys:

This was the solution we developed to meet our criteria as listed above. It should be understood that almost every environment will be different, and your criteria may be different. Hopefully the concepts behind this article can be extended to additional use cases to resolve the “License is invalid” watermark in vROps. If there’s anything I can clarify or any way I can help, contact me via Twitter @vMiklm.
VMworld 2017 – VMware Design Studio

VMworld 2017 – VMware Design Studio

One thing you should definitely make time for at VMworld is the VMware Design Studio. I have worked closely with the vRealize Operations PM & UX teams over the past year providing customer feedback, and they have extended the following invite to VMworld attendees:

Would you like to help define the next generation of VMware products and improve the ones you use today? We invite you to participate in the VMware Design Studio at VMworld 2017 US.

In the VMware Design Studio, we will show a few key product directions and design prototypes. This is a unique opportunity to get your voice heard and interact in a small group or 1:1 session with the product teams.

As a token of our appreciation, you will receive unique VMware Design Partner swag upon completion of a session!

Using PowerShell for VM Snapshot Creation & Cleanup

Using PowerShell for VM Snapshot Creation & Cleanup

There is often a use case for creating snapshots of a list of VMs in a VMware virtual environment. For example, when upgrading vRealize Operations Manager, the documentation recommends taking a snapshot of the VMs in the cluster before upgrading. With a growing number of nodes in our vROps cluster, I finally wrote some PowerShell to automate the snapshot creation and removal process. When shared with my peers in another IT group, they had another use case where they wished to skip any VMs larger than a given size (1 TB in this instance).

<#
.SYNOPSIS
 Read a list of VMs from a text file; check disk usage and take snapshot if less than 1 TB
.DESCRIPTION
 @vMiklm - miklm.com 2017-08-08
#>

# vCenter Server name (comma separate for multiple)
Connect-VIServer VCENTER_SERVER_1, VCENTER_SERVER_2

# Input :: Change this to the local path to your text list of VMs to check & snapshot
$serverList = Get-Content "e:\temp\vmInputList.txt"

# Output :: Filename for output list of successful snapshot VMs
$outputFile = 'e:\temp\vmOutputList-20170808.txt'

# snapshotName = Descriptive name of Snapshot (includes system date)
$snapshotDate=Get-date
$snapshotName = "VM Snapshot - " + $snapshotDate

# snapshotDesc = Description of snapshot including responsible user & delete by date (using system date + 7 days)
$snapshotDate=(Get-date).AddDays(7)
$snapshotDesc = "USERNAME - Delete after " + $snapshotDate

# Threshold Size is the maximum size, in GB, of the VMs to snapshot. 1024 GB = 1 TB
$thresholdSize = 1024

$snapshotServerList = @()

foreach ($server in $serverList) 
    {
    # initialize the sum variable to zero
    $diskSizeTotal = 0
       
    $Disks = Get-HardDisk -VM $server

    foreach($disk in $Disks) 
        {            
        $DiskName = $Disk.Name          
        $DisksizeinGB = ($Disk.CapacityKB * 1024)/1GB

        # use this sum variable to keep the running total of disk size in GB
        $diskSizeTotal=$diskSizeTotal+$DisksizeinGB
       }

    if ($diskSizeTotal -gt $thresholdSize)
        {
        echo $server" : "$diskSizeTotal" GB is greater than 1 TB. Snapshot skipped"
        }
    else 
        {
        echo $server" : "$diskSizeTotal" GB is less than 1 TB."
        # Take Snapshot
        New-Snapshot -VM $server -Name $snapshotName -Description $snapshotDesc
        # Add server to list array of servers with Snapshot taken; this list will be output to file to allow cleanup of snapshots
        $snapshotServerList+=$server
        }
    }

# Output list of servers that had Snapshot taken; this file should then be used as input for the snapshot cleanup script
foreach ($serverinList in $snapshotServerList) 
    {
    echo $serverinList | Out-File -Append $outputFile
    }

And here’s the accompanying script to remove snapshots when no longer required. Assumption is that the $outputFile from the above “take snapshot” script will be used as input ($serverList) for the “remove snapshot” script below.

<#
.SYNOPSIS
   Read a list of VMs from a text file and remove ALL snapshots for listed VMs
.DESCRIPTION
   @vMiklm - miklm.com - 2017-08-08
#>

Connect-VIServer VCENTER_SERVER_1, VCENTER_SERVER_2

# Change this to the local path to your list of VMs to remove snapshots
# If used with the above snapshots script, this is same file as $outputFile
$serverList = Get-Content "e:\temp\vmOutputList-20170808.txt"

foreach ($server in $serverList) 
  {
  $snapsList = Get-VM $server | Get-Snapshot
  foreach ($snapshot in $snapsList) 
    {
    Remove-Snapshot $snapshot -Confirm:$false -RunAsync
    }
  }

Code is presented for example, reference, and training. You may have to modify extensively to make any of it work in your environment. I make no claims of being a developer. I have learned what little I know by seeing how others have solved problems in PowerShell (and PHP, C#, etc.), so this is a small effort to contribute back to the community. There are certainly other ways to do this, and likely BETTER ways, but this is what I have made. Feedback & suggestions are welcome in the comments. No support, warranty, guarantee, or anything else is given with any code found on this site. Use at your own risk.

vRealize Operations Certificate Installation Error

vRealize Operations Certificate Installation Error

There is a good bit of information available for installing certificates for vROps 6.x. I encountered an issue that required a VMware Support case and uncovered some changes in vRealize Operations Manager 6.3 and 6.4.

My environment was using an internally signed SHA1 (128-bit) certificate. This was being updated to a 256-bit certificate.

The process to generate a certificate for vROps is more complex than typical, and is poorly documented by VMware. There are some articles with better information on how to create and install vROps certificates:
http://www.kanap.net/2015/02/install-a-custom-certificate-for-vrealize-operations-manager/
http://virtuallyeuc.com/vrealize-operations-manager-6-0-certificate-creation/

After carefully following the process to create the CSR, having the certificate signed, and building the .pem file, vROps refused to accept the new cert:

Operation failed. If the error persists, contact VMware support.

Review casa.log [/var/log/casa_logs/casa.log on your master vROps node] and look for something similar to:

2016-12-06 17:45:44,102 [x2000UIE] [ajp-nio-127.0.0.1-8011-exec-7] INFO support.subprocess.GeneralCommand:255 - Command '/usr/lib/vmware-vcopssuite/python/bin/python /usr/lib/vmware-casa/bin/vropsCertificateTool.py -i /storage/db/tmp/uploaded_cert.tmp --no_describe --json --level NONE' threw exception: CommandLineExitException: key=general.failure; args=1,; cause=
2016-12-06 17:45:44,103 [x2000UIE] [ajp-nio-127.0.0.1-8011-exec-7] INFO casa.security.SecurityService:946 - validateCertificateFile script's STDOUT:
{"errors": [], "exitCode": 0, "warnings": [{"warning_args": "/C=US/ST=State/L=City/O=Org/OU=Domain/CN=CA", "warning_code": "WARN-2", "warning_message": "Issuer and subject names match (/C=US/ST=State/L=City/O=Org/OU=Domain/CN=CA), but the issuer key does not. This is likely the wrong issuer certificate."}]}

So here’s what happened:
Starting in vROps 6.3, a change was made to how vROps handles the upload of a certificate.  The service used for the handling of the chain file has a file limit of 8192 bytes.
– My certificate chain (.pem file) was 10.7 KB, due to the fact that we have 2 intermediate certificates (Root Cert->Intermediate 1->Intermediate 2->Server Cert)
– vROps was essentially truncating the file, causing it to interpret the first intermediate certificate as the root, causing the “likely the wrong issuer certificate” error.
– I confirmed the issue exists on 6.3 and 6.4; the TSE was not able to replicate on 6.2.1
The vRealize Operations Manager supports custom security certificates with key length up to 8192 bits. An error is displayed when you try to upload a security certificate generated with a stronger key length beyond 8192 bits.

Solutions:
1) Use a certificate with only one intermediate, which results in a .pem file size of ~7 KB
– I had the option to request a GlobalSign certificate at minimal cost; we were in the process of requesting this anyway to rule out our internal CA as the problem. It is of course understood that this will not be an option for many users.
2) “The workaround is to edit the ‘maxInMemorySize’ value for the spring service which handles the upload of the cert. This should prevent the use of the temp file which in turn will bypass the part of the code that reads the temp file with the 10k limit.” – Provided by VMware TSE. I did not pursue this workaround as we already had the new GlobalSign certificate ready to test on the same day this workaround was proposed. I have asked for additional information on this workaround and will update if it is provided.

Hopefully this information helps diagnose failures in certificate installation in vRealize Operations 6.3 or 6.4. I’m not sure why 8 KB was the file size limit chosen, but it is too small for many environments with multiple intermediate CAs. Hopefully this will be resolved in the next release.

Update:
1) To edit ‘maxInMemorySize’ value for the spring service to allow a larger certificate upload, the following information was provided by VMware support:
a. Stop casa.
service vmware-casa stop

b. Edit /usr/lib/vmware-casa/casa-webapp/webapps/casa/WEB-INF/casa-servlet.xml
Locate this text around line 256:
<bean id="multipartResolver" class="org.springframework.web.multipart.commons.CommonsMultipartResolver">
<property name="uploadTempDir" value="file:///${application.data?/storage}/db/tmp"/>
</bean>

Add the following within the <bean> definition:
<property name="maxInMemorySize" value="30720"/>

c. Restart casa.
service vmware-casa start

2) I have been advised that a fix for this issue will be included in the next release, although I cannot confirm that and have no information on the vROps release schedule.

I want to publicly acknowledge VMware Global Support Services (GSS) Business Critical Support (BCS) and the excellent experience working with them to diagnose and resolve this issue, as well as VMware Technical Account Manager (TAM) Services. While not cheap, these service offerings provide high value.

* Update 3/3/2017
vRealize Operations 6.5 was released on 3/2/2017. The 8192 bit certificate size limit is still reflected in the documentation .

VCSA – Moving Behind A Firewall

VCSA – Moving Behind A Firewall

We have a situation where we have to deploy VMware vCenter Server Appliance (VCSA), then move it to a secured network behind a firewall.

I have not (yet) had success changing the hostname, including the FQDN, so make sure you can create proper DNS entries on both sides of the firewall and can do the initial deployment with the intended final FQDN. Our VCSA’s FQDN is of the format “vcenterserver.securednet.companynet.org” so this was achievable (the segmented domain is a subdomain of the company domain)

Deploy the appliance, then access the VCSA console and press F2, then login as root. At this point you may also need to Edit the VM Settings and change it to the new network (behind the firewall, in my case).
– Configure Management Network
– Set IP Configuration, IPv6 Configuration, DNS Configuration, Custom DNS Suffixes as required.
– (Esc) Exit, (Y) Yes Apply changes and restart management network

At this point, I got the following 2 screens. IPv6 is understandable; we disabled it. The DNS error appears even though we have validated the DNS entries/servers.

Now, to access the shell console. Login as root.

Command> shell.set --enabled True
Command> shell
# vi /etc/sysconfig/networking/devices/ifcfg-eth0

Quick vi reminder: hit (Insert) to edit the line, then (Esc), :wq! to save and exit.

Make sure all the IP information is correct in this file. I had to update the broadcast & gateway for sure. Then,

# vi /etc/hosts

Fix the entry here to reflect the new IP.

Validate settings:

# ifconfig eth0
# route -n

At this point, we were missing the default gateway in the route table, even thought it was defined in the ifcfg-eth0 file and in the IP Configuration screen of the console. Also the Broadcast address still reflects the old network, but this is less of a problem.

To temporarily fix the default gateway, do # route add default gateway XXX.YYY.ZZZ.1, using the correct gateway IP obviously.

To permanently resolve the gateway issue, log into the web console (https://vcenterserver:443/vsphere-client/) as Administrator@vsphere.local or whatever you defined as your SSO domain.
– Go to System Configuration under Administration in the main panel
– Nodes (in left column, under System Configuration)
– Select your vCenter server under Nodes
– “Edit” in the upper right corner of the main panel
– Expand nic0 & define Default gateway
– Ok
– Reboot to validate configuration persists

VMware: Multi-NIC vMotion Configuration with PowerShell

VMware: Multi-NIC vMotion Configuration with PowerShell

Changed configuration of numerous VMware clusters to utilize multi-NIC vMotion. As with all my PS, it’s quick & dirty and cobbled from a couple of example scripts. Assumes existing vmkernel port group named “vMotion”

<#
.SYNOPSIS
   Configure multi-NIC vMotion
.DESCRIPTION
   Miklm.com 08/19/2015
   Credit to examples from http://www.yellow-bricks.com/2011/09/17/multiple-nic-vmotion-in-vsphere-5/#comment-28153 & http://hostilecoding.blogspot.com/2014/01/vmware-virtual-standard-switch.html
#>

$viserver = "vCenter.local"
$cluster = "CLUSTERNAME"
$vswitchName = "vSwitch1"
$VMotionVLan = "908"
$vSwitch2Nics = "vmnic1","vmnic3"
$VMotionPortGroupName1 = "vMotion-01"
$VMotionPortGroupName2 = "vMotion-02"

Connect-VIServer $viserver

Foreach ($esxhost in (Get-Cluster -name $cluster | Get-VMHost))
{
  $vswitch = Get-VirtualSwitch -VMHost $esxhost -Name $vswitchName

  # Remove the original "vMotion" VMkernel Port group
  Remove-VMHostNetworkAdapter -Nic (Get-VMHostNetworkAdapter -VMHost $esxhost | where {$_.PortGroupName -eq "vMotion"}) -Confirm:$false
  Remove-VirtualPortGroup -VirtualPortGroup (Get-VirtualPortGroup -Name "vMotion" -vmhost $esxhost) -Confirm:$false

  # Configure virtual switch for Multi-NIC vMotion
  $vportgroup1 = New-VirtualPortGroup -VirtualSwitch $vswitch -Name $VMotionPortGroupName1 -VLanId $VMotionVLan
  $vportgroup2 = New-VirtualPortGroup -VirtualSwitch $vswitch -Name $VMotionPortGroupName2 -VLanId $VMotionVLan

  $vNic1 = New-VMHostNetworkAdapter -VMHost $esxhost -VirtualSwitch $vswitch -PortGroup $vportgroup1 -VMotionEnabled:$true
  $vNic2 = New-VMHostNetworkAdapter -VMHost $esxhost -VirtualSwitch $vswitch -PortGroup $vportgroup2 -VMotionEnabled:$true

  $vportgroup1 | Get-NicTeamingPolicy | Set-NicTeamingPolicy -MakeNicActive $vSwitch2Nics[0] -MakeNicStandBy $vSwitch2Nics[1]
  $vportgroup2 | Get-NicTeamingPolicy | Set-NicTeamingPolicy -MakeNicActive $vSwitch2Nics[1] -MakeNicStandBy $vSwitch2Nics[0]
}